5.19.2014

More Mother's Day Potholders


Here are a couple more potholders I finished a few weeks ago for mother's day. These two were for my mom and Gran.


Like I mentioned in my previous post a few days ago, I used Amy's tutorial from Nana and Co. She has a great step by step tutorial on how to create these. View her tutorial here.


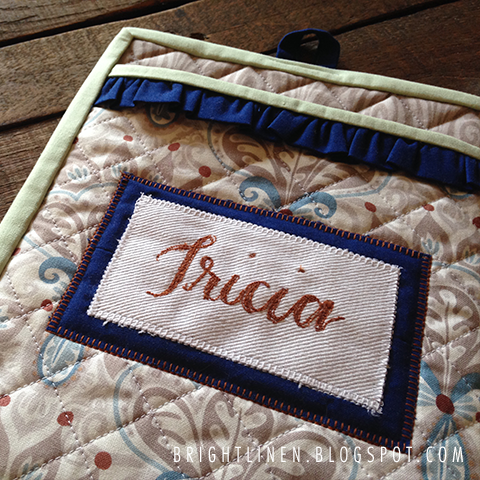
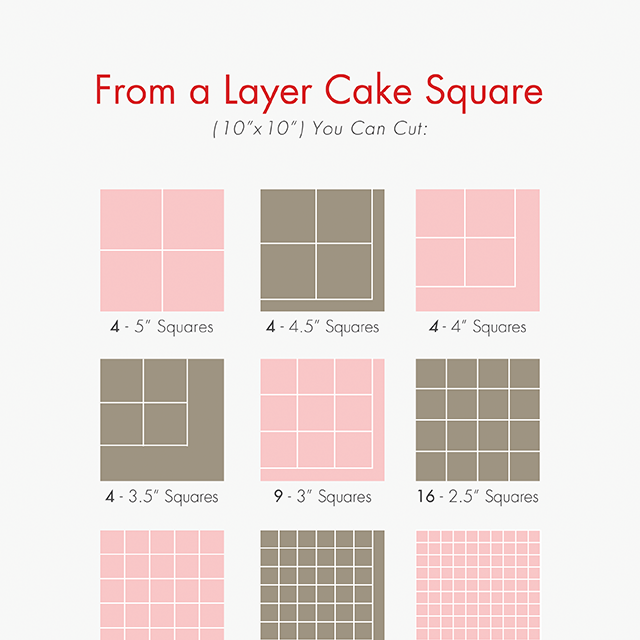
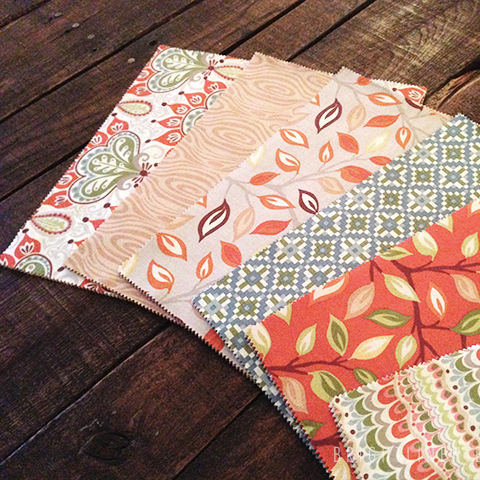
The main prints I used in this project were pulled from a Serenade layer cake I have by Kate Spain for Moda. The ruffle and binding fabric was some I've had on hand for a while. The gray is a Kona solid I think, and the white fabric is canvas I purchased from Joann's. 


Again, I wanted to make this extra personal so I decided to stitch "Mom" on the white canvas. I did this by writing out "Mom" with a disappearing ink pen on my fabric. I then dropped my feed dogs and used my darning foot to stitch over what I had drawn. I tried to make the down strokes a tad thicker for the text to look similar to calligraphy.


For the quilting I used my old faithful meandering free motion pattern.


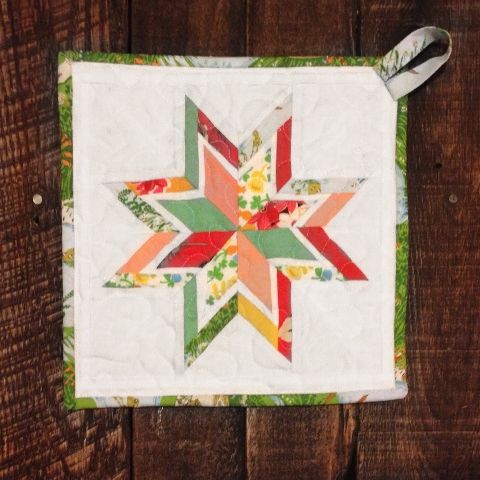
Here is the one I created for my grandmother. Again, the patterned fabric is from my Serenade layer cake.


I call my grandmother "Gran" so I decided to stitch that on the canvas. I do recommend starting out with a big piece of canvas so you can cut it down after you've stitched the name one. This gives you more control with the border of negative space.


Here they are together! So cute. 


They each took only one night after work to complete, which isn't too bad! 


I love the way they turned out and hope my mom and Gran did too. :) I need to make one for us. Although, it's so much harder to motivate myself to make projects for our home verses projects for others. I always have a deadline with gifts. I need to start making deadlines for myself!

Related Posts:

Tricia's Potholder
Tricia's Potholder
JellyRollQuilt
Starburst Potholder
ChicopeePotholder
Chicopee Potholder

5.16.2014

Cutting Guide: Yardage vs. Inches


Here's a little chart showing how many inches are in different yardage cuts. I found this chart on The Lost Apron and used Ana's measurements to make a chart of my own! Knowing how many inches are in different yardage cuts may help you decide how much fabric you need. 

This is especially helpful when you're at the cutting table and the sweet lady is waiting for you to give her a length to cut while you frantically try to measure out what you need in your head. Although, you may be like me and ask "Could you show me how much 1/2 a yard more is?" "Ok, could I see how much just a 1/4 yard more is?" "So sorry, could I see 1/2 a yard again?" And then after all that you just decide to get a whole yard extra, just in case. Haha. 


Let me know if you have any questions!

Related Posts:

HalfSquareTriangle
Half Square Triangles
LayerCakeCuts
Layer Cake Cuts
FatQuarterCuts
Fat Quarter Cuts
Basic Quilt Sizes
Basic Quilt Sizes
Creating Charm Squares
Fat Eight Cuts
Fat Eighth Cuts

5.14.2014

Fotostrap Collaboration


I'm so honored to have been a featured artist on Fotostrap's blog! They recently released their new Artist Series Fotostrap. With this new Fotostrap you can tap into your inner creative and personalize your very own white canvas Artist Fotostrap. With this new release they will be feature various artist who collaborated with them to showcase how you can customize the Artist Fotostrap. I was so excited when they asked if I would like to work on one! You can view my other calligraphy projects on my calligraphy blog here.

Here's a little bit about Fotostrap from their website if you aren't familiar with their wonderful company:

Fotostrap is the camera strap that gives back. With every purchase, Fotostrap donates 10% to Fotolanthropy, a non-profit that gives portrait sessions and short films to inspiring people who are overcoming adversity. By choosing Fotostrap, you are directly helping to fund Fotolanthropy! It is because of our Fotostrap customers that Fotolanthropy can continue to give, capture and share inspiring true stories. Learn about this movement by visiting www.fotolanthropy.com.


I knew I wanted to do some sort of painted text on the strap and decided to paint a bible verse. I used the first part of Colossians 3:15 which says "Let the peace of Christ rule in your hearts." As someone who tends to worry, I have to remind myself of this verse often. 


These are some behind the scenes pictures. I love the way the strap turned out! 


I'm wearing the one I completed on the left and Daniel and showing what the Artist Fotostrap looks like when you buy it; before customization.  Daniel also put together a little behind the scenes video showing my process of creating my strap. Take a look!


You can read the entire post here and can purchase your own Artist Fotostrap here. Browse around their site and look at all their beautiful Fotostraps for sale. They are such great quality and would be an amazing gift for anyone with a camera!

5.13.2014

Tricia's Mother's Day Potholder


I recently finished a potholder for my mother-in-law. I decided to give the special women in my life little potholders for Mother's Day! When figuring out what kind I wanted to make, I remembered seeing this tutorial from Nana Company. Amy has a great step by step tutorial on how to make this pretty little potholder. You should go check it out and make your very own!


This is the first of three I made for Mother's Day. I didn't want to have to cut my binding fabric on the bias since it leaves the unused fabric in such a weird shape. After finishing this with angled corners, I wished I had just cut my fabric on the bias. Amy's rounded corners make it so much cuter! It's still cute, but I decided to make the other two with rounded corners. The patterned fabric I used in this was from a Serenade layer cake by Kate Spain that I had on hand. So many cute fabrics in that line! Amy suggests using this classic diamond straight line quilting. This was the hardest part for me! Ha. I don't know what it is, but I don't enjoy straight line quilting. It takes so much longer than free motion quilting for me. Needless to say, this was the only potholder I quilted with straight line quilting. :)


Amy uses cute little fabric patches on the front of hers. I didn't have anything like that so I decided to sew her name on a piece of white canvas. I just wrote out her name with a disappearing ink pen and dropped my feed dogs on my machine to sew over the lines smoothly. I started with a big piece of what canvas so that I could square it up after I had sewn her name. I think it turned out well! I hope she enjoys using it as much as I enjoyed making it! :)

Related Posts:

ChicopeePotholder
Chicopee Potholder
Serinade
Serenade

5.06.2014

Baby Boy Smalley's Quilt


I recently finished a baby boy quilt for a friend of mine!


I decided to use fabrics I had in my stash for this. I'm really trying not to let my stash get out of control! It's such hard work. It's so much more fun buying brand new fabric! Ha.


This is another half square triangle quilt like this tutorial I made. Since I used fabric from my stash rather than fat quarters, I decided to start with 10" squares rather than the four 9" squares you get from a single fat quarter. 10" layer cake squares would be great to use for this quilt.


For the backing, I purchased the same Lost and Found 2 - Strip Gray print from Riley Blake that I used on this baby boy quilt. I browsed around for other options but I just love this one so much! It's a perfect understated boy pattern that matches just about anything.


For the binding I used Bella Solids Royal yardage from Moda. I thought about going with a bright orange for contrast, but I knew the nursery was all blues. 


I used a meandering free motion quilt pattern for the quilting. I just love how crinkly it looks after you wash and dry quilts. If you'd like a tutorial on this kind of quilting, Elizabeth Hartman of Oh Frannson! has a great one here.


I hope this gets used often for play time, tummy time, wrapping him up for walks, etc. I can't wait to meet the little guy in just a few weeks!


They haven't quite decided on a name yet, so for the packing I used their last name. 


 I featured this packaging on my calligraphy blog if you wanted to take a look! :)

Related Posts:

HST Quilt Tutorial
HST Quilt Tutorial
HalfSquareTriangleBabyQuilt
HST Baby Quilt
HST Baby Quilt
HST Girl Quilt